Hi all!
I just love using background stamps, don't you? Bold or subtle, it adds so much interest to your cards or layouts.
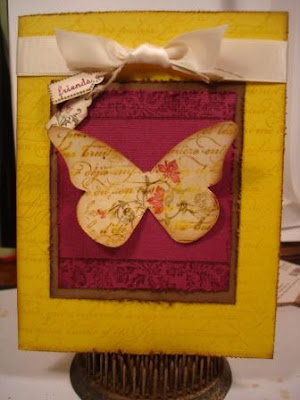
Here's a card I made for a friend using the Stampin' Up! Beautiful Butterflies Bigz Die(114507) and stamped with one of my favorite backgrounds, En Francais(109521) along with Vintage Vogue(117690-wood, 118598-clear), and Tiny Tags(118091-wood, 118592-clear).
How about a little step by step?...
- Crushed Curry (5 1/2 x 4 1/4"), stamped with En Francais in Crushed Curry.
- Card edges distressed with Cutter Kit and sponged with Soft Suede Classic Ink.
- Layers of Soft Suede(3 1/2 x 3") and Textured Rich Razzleberry( 3 1/4 x 2 3/4") are distressed and sponged with Soft Suede Classic.
- Rich Razzleberry Classic Ink used to stamp border floral image from Vintage Vogue on the Rich Razzleberry piece.
- Cut Beautiful Butterfly with Big Shot(113439) from Naturals Ivory card stock.
- Ink En Francais background again with Crushed Curry Classic Ink. Then, take your Soft Suede Classic Ink pad and apply sparingly directly over the Crushed Curry ink. You do not want full coverage here...just enough to give an aged, vintage look. Stamp your butterfly.
- Using your Stampin' Write Markers (Rich Razzleberry and Soft Suede) to apply ink to the floral vine image from Vintage Vogue and stamp on the butterfly over the En Francais background.
- Sponge edges of butterfly with Soft Suede.
- Apply a layer of Crystal Effects over the stamped butterfly. It will take a while to dry but really makes the colors pop and is worth the effort!
- Cut a slit in the upper fold of the card base with your Craft and Hobby Blade. This will allow you to slide your ribbon through it. I used about 15" of Vanilla 5/8" Satin Ribbon.
- Stamp images from Tiny Tags and punch with Medium Jewelry Tag Punch(117190). Pierce a hole in each tag with your Paper Piercing Tool.
- Use Linen Thread(104199) to attach tags to your ribbon. I placed the ends of the strands of Linen Thread on the ribbon before I tied the knot and this secured these tags to the ribbon.
- Complete card by adding butterfly to layers and then this piece to the card.
Let me know in the comment section if you liked this step by step. If so, I'll try to feature a card once a week with the instructions this way.
Have a great day!--Lisa

5 comments:
So pretty, Lisa!
Simply GORGEOUS Lisa!!! I love this vintage look!!! Have a wonderful weekend!!! Hugs ~S~
Beautiful, Lisa! Love the way you used those stamps to create this beauty!
Your butterfly is simply beautiful. I will have to give this one a try ;) TFS.
What a beautiful vintage card! I love the design, and now I will have to get this butterfly. I would love to know where you found the florist frog, since i can't seem to find one any where!
Post a Comment